Flutter 你须要知道的那些事 01

公众号「AndroidTraveler」首发。git
1. width 属性
对于设置控件宽度填充父控件这件事情,在 Android 里面,只须要设置 MATCH_PARENT 便可。github
可是在 Flutter 里面却不是这样,由于 Flutter 要具体的数值。api
因此咱们能够这样考虑,假设我这个值很是大,比全部市面上的设备宽度还要大,那么是否是表现出来就是充满父控件了。bash
因此这边的作法是设置为无限,即 double.infiniteapp
咱们以一个经常使用场景来讲明。less
好比设置图片填充屏幕宽度。ide
刚开始没有设置的代码以下:测试
import 'package:flutter/material.dart';

void main() => runApp(MyApp());

class MyApp extends StatelessWidget {
  @override
  Widget build(BuildContext context) {
    return MaterialApp(
        home: Scaffold(
          appBar: AppBar(
            title: Text('My Flutter'),
          ),
          body: Center(
            child: Image.asset('assets/images/example.jpeg'),
          ),
        )
    );
  }
}
复制代码
效果:ui
能够看到没有设置的状况下,显示会根据图片自身的宽高显示。this
这个时候若是设置 width 为无穷大,修改代码以下:
child: Image.asset('assets/images/example.jpeg', width: double.infinity,),
复制代码
效果
什么状况,没起做用?
这个时候不要慌,咱们来给你们分析分析。
之后你们遇到相似问题也能够这样分析。
咱们经过给 Image 外面套上一层 Container,而后设置背景颜色来对比一下。
代码以下:
import 'package:flutter/material.dart';

void main() => runApp(MyApp());

class MyApp extends StatelessWidget {
  @override
  Widget build(BuildContext context) {
    return MaterialApp(
        home: Scaffold(
      appBar: AppBar(
        title: Text('My Flutter'),
      ),
      body: Center(
        child: Container(
          color: Colors.blue,
          //left
//          child: Image.asset('assets/images/example.jpeg',),
          //right
          child: Image.asset('assets/images/example.jpeg', width: double.infinity,),
        ),
      ),
    ));
  }
}
复制代码
效果以下:
能够看到,设置宽度以后,Image 确实是填充了宽度,只不过因为图片自己没有那么宽,所以看起来就觉得是没有起做用。
那么如何让图片能够填充宽度呢?
这个就涉及到图片的填充模式了。
2. fit 属性
点击 Image 的 fit 属性进入源码能够看到以下:
/// How to inscribe the image into the space allocated during layout.
///
/// The default varies based on the other fields. See the discussion at
/// [paintImage].
final BoxFit fit;
复制代码
咱们再点一下 BoxFit,能够看到以下:
/// How a box should be inscribed into another box.
///
/// See also [applyBoxFit], which applies the sizing semantics of these values
/// (though not the alignment semantics).
enum BoxFit {
/// Fill the target box by distorting the source's aspect ratio. /// /// 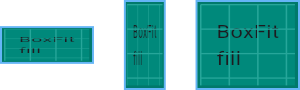 fill, /// As large as possible while still containing the source entirely within the /// target box. /// /// 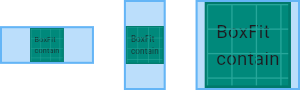 contain, /// As small as possible while still covering the entire target box. /// ///  cover, /// Make sure the full width of the source is shown, regardless of /// whether this means the source overflows the target box vertically. /// /// 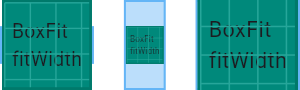 fitWidth, /// Make sure the full height of the source is shown, regardless of /// whether this means the source overflows the target box horizontally. /// /// 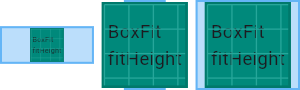 fitHeight, /// Align the source within the target box (by default, centering) and discard /// any portions of the source that lie outside the box. /// /// The source image is not resized. /// /// 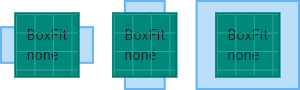 none, /// Align the source within the target box (by default, centering) and, if /// necessary, scale the source down to ensure that the source fits within the /// box. /// /// This is the same as `contain` if that would shrink the image, otherwise it /// is the same as `none`. /// /// 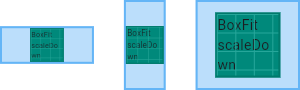 scaleDown, } 复制代码
相信你们看到源码的注释应该很清楚每一个值的意义了。
若是你还不清楚,能够点击注释里面对应的连接去查看示意图。
好比以咱们这个实际应用场景填充宽度为例,那么咱们能够看到 fitWidth 应该是符合咱们要求的,咱们点击注释的连接,跳转能够看到图片以下:
很形象的作了几种状况的示意。咱们设置了 Image 的 fit 属性以下:
child: Image.asset('assets/images/example.jpeg', width: double.infinity, fit: BoxFit.fitWidth,),
复制代码
效果:
能够看到已经知足咱们的需求了。
舒适提示:测试完以后不要忘记去掉测试的 Container 以及对应颜色哦~
3. print
咱们知道在 Android 里面,当咱们 try catch 以后,咱们打印异常基本会写出相似下面代码:
Log.e(TAG, "exception="+e);
复制代码
在 Flutter 也有异常捕获。
你可能会习惯的写出以下代码:
print('exception='+e);
复制代码
可是切记,不要使用上面的写法。
由于当 e 为 null 时,上面的 print 不会执行打印。
这可能会误导你。由于你在成功的时候加上打印语句,异常捕获也加上打印语句。可是程序就是没有打印。你就会以为很奇怪。
实际上当 e 为 null 时,print 语句会报错,+ 号链接的左右不能是 null,因此不会正常打印。所以请避免上面的写法。能够用下面的替换写法:
//替换写法一
print('exception=');
print(e);
//替换写法二
print('exception='+(e ?? ''));
//替换写法三
var printContent = e ?? '';
print('exception='+printContent);
复制代码
4. GestureDetector
咱们知道若是要给一个 Widget 增长点击事件,最简单的方法就是套一层 GestureDetector。
可是有时候你这样作了,却发现有些“隐患”,或者说,有些你意料不到的事情。
这里用一个场景来告诉你,你平时可能没有发现的细节。
微博里面有点赞这个小组件,咱们写下以下代码:
import 'package:flutter/material.dart';

void main() => runApp(MyApp());

class MyApp extends StatelessWidget {
  @override
  Widget build(BuildContext context) {
    return MaterialApp(
        home: Scaffold(
      appBar: AppBar(
        title: Text('My Flutter'),
      ),
      body: Row(
        children: <Widget>[
          Image.asset('assets/images/2.0x/like.png', width: 20, height: 20,),
          SizedBox(width: 5,),
          Text('30')
        ],
      ),
    ));
  }
}
复制代码
效果以下:
假设咱们要求给这个点赞组件加上点击事件,那么咱们直接给 Row 套上 GestureDetector Widget。
import 'package:flutter/material.dart';

void main() => runApp(MyApp());

class MyApp extends StatelessWidget {
  @override
  Widget build(BuildContext context) {
    return MaterialApp(
        home: Scaffold(
      appBar: AppBar(
        title: Text('My Flutter'),
      ),
      body: GestureDetector(
        onTap: (){
          print('onTap');
        },
        child: Row(
          children: <Widget>[
            Image.asset('assets/images/2.0x/like.png', width: 20, height: 20,),
            SizedBox(width: 5,),
            Text('30')
          ],
        ),
      ),
    ));
  }
}
复制代码
点击点赞组件确实会打印 onTap,可是若是你点击了点赞图标和数字中间的白色区域,你会发现点击事件没有回调,没有打印。
这个时候有两种解决方法:
1. 给空白组件设置 color 属性,颜色值设置透明
对于 Container 设置的 padding 能够直接设置,对于咱们这里例子的 SizeBox 须要改成以下:
SizedBox(width: 15, child: Container(color: Colors.transparent,),),
复制代码
为了方便测试,这边将宽度改成 15。
因此对于设置 GestureDetector 的 Container,若是没有设置 color 属性,那么点击空白不会回调。
2. 设置 GestureDetector 的 behavior 属性(推荐方式)
其实若是你须要空白区域也响应点击,只须要设置一下 GestureDetector 的 behavior 属性便可。
behavior 默认值为 HitTestBehavior.deferToChild,咱们这里将其设置为 HitTestBehavior.translucent。
代码以下:
import 'package:flutter/material.dart';

void main() => runApp(MyApp());

class MyApp extends StatelessWidget {
  @override
  Widget build(BuildContext context) {
    return MaterialApp(
        home: Scaffold(
      appBar: AppBar(
        title: Text('My Flutter'),
      ),
      body: GestureDetector(
        behavior: HitTestBehavior.translucent,
        onTap: (){
          print('onTap');
        },
        child: Row(
          crossAxisAlignment: CrossAxisAlignment.start,
          children: <Widget>[
            Image.asset('assets/images/2.0x/like.png', width: 20, height: 20,),
            SizedBox(width: 15),
            Text('30')
          ],
        ),
      ),
    ));
  }
}
复制代码
这里的点赞图片我直接从网上获取的,你测试能够用随便一张图片代替验证。或者用两个文原本验证也是能够的。
- 1. Flutter 你须要知道的那些事 01
- 2. PWA,你须要知道的那些事
- 3. Flutter 你需要知道的那些事 01
- 4. BGA你要知道的那些事!
- 5. 那些android你需要知道的事
- 6. 2017年,开发App你须要知道的那些事
- 7. 从无到满意offer,你须要知道的那些事
- 8. ASP.NET MVC必须知道的那些事!
- 9. 你须要知道的那些 Java 字节码知识
- 10. Android的.so文件你须要知道那些知识
- 更多相关文章...
- • Web 品质 - 重要的 HTML 元素 - 网站品质教程
- • RDF 主要 元素 - RDF 教程
- • 再有人问你分布式事务,把这篇扔给他
- • 常用的分布式事务解决方案
-
每一个你不满意的现在,都有一个你没有努力的曾经。