史上最详细建立 Android AIDL 远程服务的步骤
项目介绍
- 建立时间:2019年10月4日16:30:09
- 实现功能:
Android远程服务的制做与测试运行,AIDL服务。 - 开发环境介绍:
Android API = 29即Android 10,开发IDE是Android Studio
吐槽
网上搜了N多文章,要么年代久远,要么开发IDE不一样操做不懂(小白搞不懂。。),本文以最详细的步骤实现最简的 AIDL 远程服务的制做和调用。java
实现步骤
- 概述
在
Android Studio中建立了空的工程(其实后来没用到,不过为了配合源码仍是要说下),建立模块rsserver- 因为Android Studio和IDEA一个德行的,这里只能叫它模块了 - 英文名是module吗。本模块用来制做一个服务能够在本模块的activity中调用,能够提供给其余app或者模块使用,再建立一个客户端模块rsclient- 这里的rs表示remote service。那么最终造成的结构以下图: android
后面的步骤为先制做服务端模块中的服务而且测试经过后再制做客户端模块,让咱们开始吧。git
-
制做
AIDL接口文件,在服务端模块的根节点上经过右键菜单建立一个AIDL文件
将其命名为IProcessInfo,其中只要定义一个方法不用实现,所有代码以下(建立完毕后会有一个默认的方法,将其删除掉,而后追加一个咱们本身的方法)github// IProcessInfo.aidl package com.ccsoft.rsserver; // Declare any non-default types here with import statements interface IProcessInfo { int getProcessId(); }保存后
AS会自动建立同名的接口文件,以后建立服务的时候要用到app -
实现
AIDL文件中定义的方法
在项目包com.ccsoft.rsserver下建立包service再在其下建立服务IProcessInfoImpl继承自IProcessInfo.Stub,其所有代码以下idepackage com.ccsoft.rsserver.service; import android.os.RemoteException; import com.ccsoft.rsserver.IProcessInfo; public class IProcessInfoImpl extends IProcessInfo.Stub { @Override public int getProcessId() throws RemoteException { return android.os.Process.myPid(); } }调用本方法会打印进程ID,最终造成的结构以下图
布局 -
建立服务,用来返回实现接口的类的实例,其所有代码以下:测试
package com.ccsoft.rsserver.service;

import android.app.Service;
import android.content.Intent;
import android.os.IBinder;
import android.util.Log;

import androidx.annotation.Nullable;

public class MyRemoteService extends Service {
    private static final String TAG = "chanchaw";
    IProcessInfoImpl mProcessInfo = new IProcessInfoImpl();

    @Nullable
    @Override
    public IBinder onBind(Intent intent) {
        Log.e(TAG, "MyRemoteService thread id = " + Thread.currentThread().getId());
        return mProcessInfo;
    }
}
最终实现的结构以下
this -
接下来为服务端建立一个
Activity用来测试服务是否可用,先建立布局文件activity_main,其所有代码以下:spa<?xml version="1.0" encoding="utf-8"?> <LinearLayout xmlns:android="http://schemas.android.com/apk/res/android" android:orientation="vertical" android:layout_width="match_parent" android:layout_height="match_parent"> <Button android:layout_width="wrap_content" android:layout_height="wrap_content" android:text="绑定本地服务" android:onClick="bindLocalService" /> </LinearLayout>最终造成的结构以下图
-
建立一个
Activity显示该布局而且测试服务,命名为MainActivity,其所有代码以下:package com.ccsoft.rsserver; import android.app.Activity; import android.content.ComponentName; import android.content.Context; import android.content.Intent; import android.content.ServiceConnection; import android.os.Bundle; import android.os.IBinder; import android.os.RemoteException; import android.util.Log; import android.view.View; import androidx.annotation.Nullable; import com.ccsoft.rsserver.service.MyRemoteService; public class MainActivity extends Activity { // 打印日志时用来过滤,快速找到调试信息 private static final String TAG = "chanchaw"; @Override protected void onCreate(@Nullable Bundle savedInstanceState) { super.onCreate(savedInstanceState); // 关联到 res/layout/activity_main.xml,会显示其中定义的控件 setContentView(R.layout.activity_main); } // 建立 ServiceConnection 类型的对象实例,在后面绑定服务时会用到 ServiceConnection myServiceConnection = new ServiceConnection() { /** * 服务绑定成功后会调用本方法 * @param name


*/
      @Override
      public void onServiceConnected(ComponentName name, IBinder service) {

          Log.i(TAG, "MyRemoteService onServiceConnected");
          // 经过aidl取出数据
          IProcessInfo processInfo = IProcessInfo.Stub.asInterface(service);
          try {
              Log.i(TAG, "MyRemoteService process id = " + processInfo.getProcessId());
          } catch (RemoteException e) {
              e.printStackTrace();
          }
      }

      @Override
      public void onServiceDisconnected(ComponentName name) {
          Log.i(TAG, "MyRemoteService onServiceDisconnected");
      }
  };

  public void bindLocalService(View v){
      Intent intent = new Intent(this, MyRemoteService.class);
      bindService(intent, myServiceConnection, Context.BIND_AUTO_CREATE);

  }

  @Override
  protected void onDestroy() {
      super.onDestroy();
      unbindService(myServiceConnection);
  }
}
最终造成的结构以下 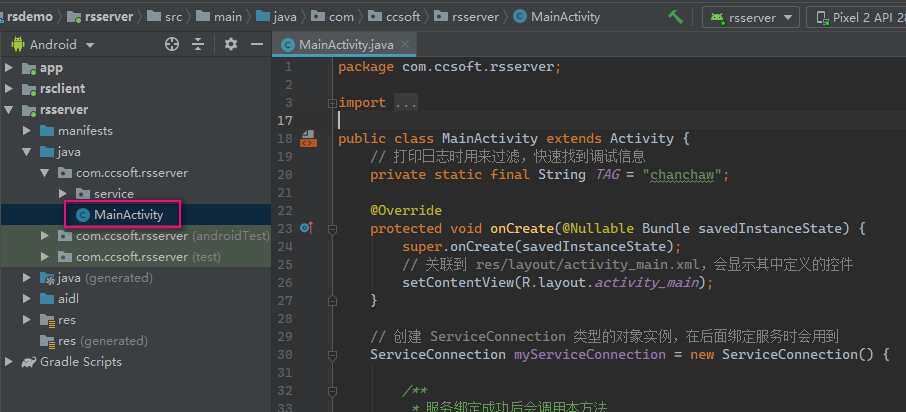 - 在模块清单文件 ``AndroidManifest.xml`` 中注册``Activity`` 和服务,其所有代码以下:
<manifest xmlns:android="http://schemas.android.com/apk/res/android"
package="com.ccsoft.rsserver">

  <application
      android:allowBackup="true"
      android:icon="@mipmap/ic_launcher"
      android:label="@string/app_name"
      android:roundIcon="@mipmap/ic_launcher_round"
      android:supportsRtl="true"
      android:theme="@style/AppTheme" >

      <activity android:name=".MainActivity" android:label="MainActivity">
          <intent-filter>
              <action android:name="android.intent.action.MAIN" />
              <category android:name="android.intent.category.LAUNCHER" />
          </intent-filter>
      </activity>

      <service android:name=".service.MyRemoteService" android:process=":remote">
          <intent-filter>
              <action android:name="com.jxx.server.service.bind" />
              <category android:name="android.intent.category.DEFAULT" />
          </intent-filter>
      </service>

  </application>
</manifest>
- 在服务端测试上面制做的服务,成功的话则完成了所有工做的70%,效果以下图 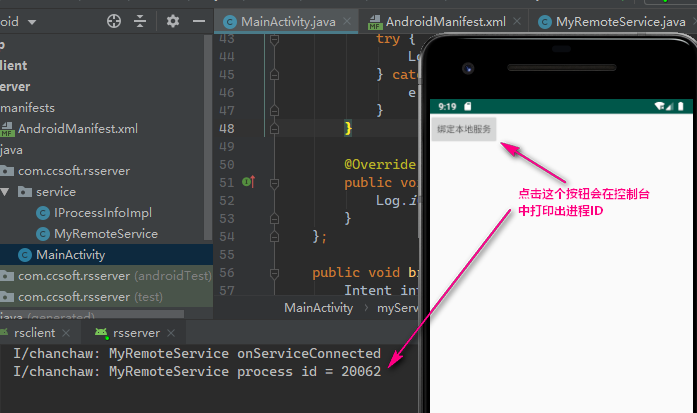 - 建立客户端模块,而后将服务端模块中的 ``AIDL`` 连带其下的文件一块儿拷贝到客户端模块中,以下图 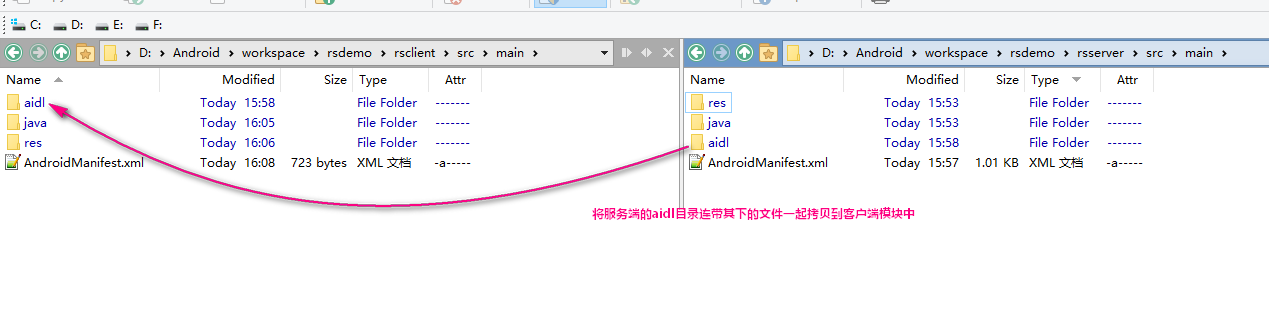 - 拷贝过去后切记要使用 ``ctrl + F9`` 构建下客户端模块,这样才会生成接口文件,以下图 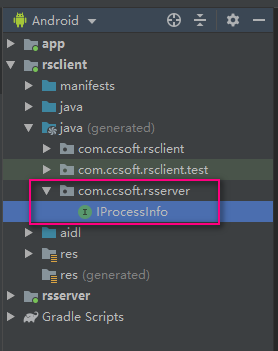 - 客户端模块中建立 ``activity`` 的布局文件,其所有代码以下:
<?xml version="1.0" encoding="utf-8"?>
<LinearLayout xmlns:android="http://schemas.android.com/apk/res/android"
android:orientation="vertical" android:layout_width="match_parent"
  android:layout_height="match_parent">

  <TextView
      android:id="@+id/rsclient_textview"
      android:layout_width="wrap_content"
      android:layout_height="wrap_content"
      android:text="rsclient_textview" />

  <Button
      android:layout_width="wrap_content"
      android:layout_height="wrap_content"
      android:text="绑定远程服务"
      android:onClick="bindRemoteService" />
</LinearLayout>
造成的结构以下  - 建立 ``Activity``,所有代码以下
package com.ccsoft.rsclient;
import android.app.Activity;
import android.content.ComponentName;
import android.content.Intent;
import android.content.ServiceConnection;
import android.os.Bundle;
import android.os.IBinder;
import android.os.RemoteException;
import android.util.Log;
import android.view.View;
import android.widget.TextView;
import androidx.annotation.Nullable;
import com.ccsoft.rsserver.IProcessInfo;
public class MainActivity extends Activity {
private static final String TAG = "chanchaw";

  TextView text = null;
  @Override
  protected void onCreate(@Nullable Bundle savedInstanceState) {
      super.onCreate(savedInstanceState);
      setContentView(R.layout.activity_main);

      text = findViewById(R.id.rsclient_textview);
  }

  // 绑定远程服务
  public void bindRemoteService(View v){
      Intent intent = new Intent();
      intent.setAction("com.jxx.server.service.bind");//Service的action
      intent.setPackage("com.ccsoft.rsserver");//App A的包名
      bindService(intent, mServerServiceConnection, BIND_AUTO_CREATE);
  }


  ServiceConnection mServerServiceConnection = new ServiceConnection() {
      @Override
      public void onServiceConnected(ComponentName name, IBinder service) {

          Log.i(TAG, "MyRemoteService onServiceConnected");
          // 经过aidl取出数据
          IProcessInfo processInfo = IProcessInfo.Stub.asInterface(service);
          try {
              Log.i(TAG, "MyRemoteService process id = " + processInfo.getProcessId());
              text.setText("绑定成功!");
          } catch (RemoteException e) {
              e.printStackTrace();
          }
      }

      @Override
      public void onServiceDisconnected(ComponentName name) {
          Log.i(TAG, "MyRemoteService onServiceDisconnected");
      }
  };
}
最终造成的结构以下 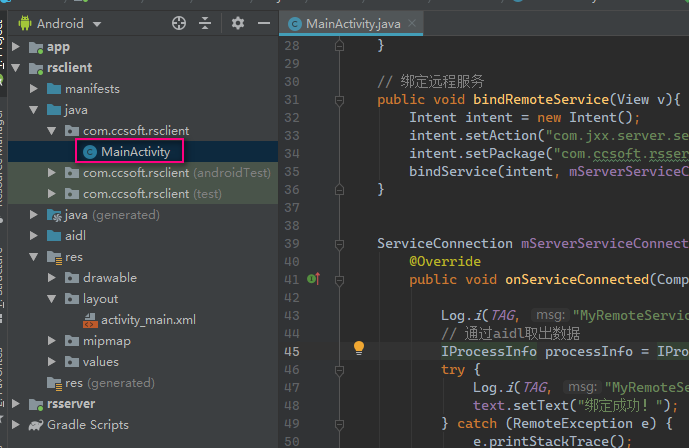 - 清单文件中注册 ``Activity``,所有代码以下
<manifest xmlns:android="http://schemas.android.com/apk/res/android"
package="com.ccsoft.rsclient">

  <application
      android:allowBackup="true"
      android:icon="@mipmap/ic_launcher"
      android:label="@string/app_name"
      android:roundIcon="@mipmap/ic_launcher_round"
      android:supportsRtl="true"
      android:theme="@style/AppTheme" >

      <activity android:name=".MainActivity" android:label="MainActivity">
          <intent-filter>
              <action android:name="android.intent.action.MAIN" />
              <category android:name="android.intent.category.LAUNCHER" />
          </intent-filter>
      </activity>
  </application>
</manifest>
这里不用注册远程的服务,由于是远程调用的 - 在客户端模块中测试调用远程服务 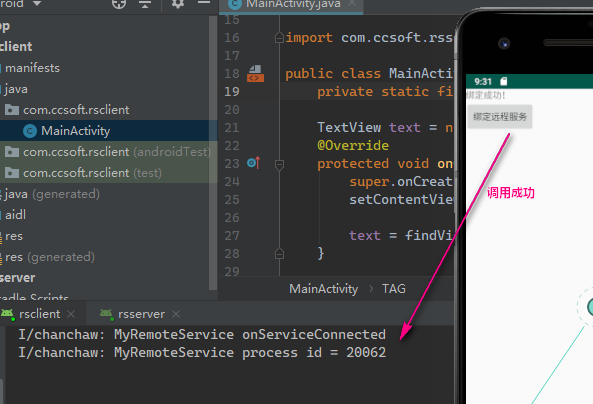 #### 结束语
- 1. Android 创建AIDL的步骤
- 2. App上线流程全攻略(史上最详细步骤)
- 3. 建立ContentProvider的详细步骤
- 4. Gradle 建立java程序详细步骤
- 5. FTP服务器搭建详细步骤
- 6. Git上传到远程仓库步骤(详细步骤)
- 7. Java建立远程服务的5个步骤
- 8. VMwareWorkstation中安装Centos6.5(史上最详细的步骤)
- 9. Kali linux安装步骤,史上最详细的步骤,傻瓜式教学
- 10. 登录服务器的详细步骤
- 更多相关文章...
- • 服务器上的 XML - XML 教程
- • Spring整合Redis详细步骤 - Redis教程
- • Tomcat学习笔记(史上最全tomcat学习笔记)
- • Spring Cloud 微服务实战(三) - 服务注册与发现
-
每一个你不满意的现在,都有一个你没有努力的曾经。